![]() QuickBilling
Overview
QuickBilling
Overview
QuickBilling is a QuickPractice service that allows you to send
your claims to the insurance carrier electronically, rather than printing them
to be mailed.
Billing your insurance claims electronically is typically preferred to mailing them, if only because they arrive at the insurance carrier more quickly than they would had they been mailed through the postal system. Furthermore, electronic claims are generally processed faster than paper bills, and thus paid faster.
Before you can begin using the QuickBilling method to generate your claims a number of things must happen first. This includes enrollment for our electronic billing service as well as a payment agreement for claims processing fees. Also, the electronic billing must be configured by a QuickPractice technician during what is informally referred to as a "test run".
During the "test run" phase, the technician will configure your QuickBilling settings and also check your software thoroughly to ensure that provider numbers as well as insurance carrier electronic payer IDs are all entered correctly. Furthermore, the technician will train you and your office on the QuickBilling report and how it is used to track the status of claims billed electronically.
Only after both the enrollment and "test run" processes are complete, will you will be allowed to bill your claims through QuickPracitce's electronic billing service. Fortunately, doing so is very similar to generating claims to be printed on paper.
To send a claim electronically instead of printing it, follow the procedure below.
1. Click the
"QuickLink" at the top of the screen
2. OR open a patient file and navigate to the Insurance Tab and then click the Add button. The Insurance Billing button will appear.
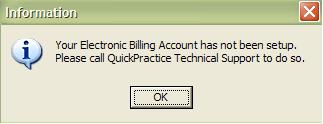
3. Place the dot next to the Electronic label. If your software has not yet been configure for electronic billing the following error will appear and you will need to call technical support.
4. If you wish to send all of your unbilled services at one time, leave the check mark next to the All Unbilled Services label. Otherwise, use the Selective Settings explained in the previous Insurance Billing section.
5. Click the Start button to initiate the billing run. A progress bar will display the amount of claims being generated.
6. After the claims have been transmitted electronically, you will immediately see your QuickBilling report.**
7. Once a claim has been transmitted electronically, it will receive a unique claim number that can be viewed from the Insurance Claims tab in the patient file. The notes label will indicate the claim was transmitted through QuickPractice's QuickBilling service.
** ! IMPORTANT: The QuickBilling report displays the status of each insurance claims billed electronically. Generally, the desired status at this point is "Claim Received by QuickBilling Server" and "Claim Validated by QuickBilling Server." If you see a different note on the QuickBilling report, such as a rejection notice, you will need to troubleshoot the rejection according to the error you received. Often is helpful to call technical support so that one of QuickPractice's support agents can help you to troubleshoot the rejection. After the error has been corrected, delete and re-bill the claim. To read more about the QuickBilling report, refer to the bottom of this section.
To delete and rebill a rejected claim
1. Click the
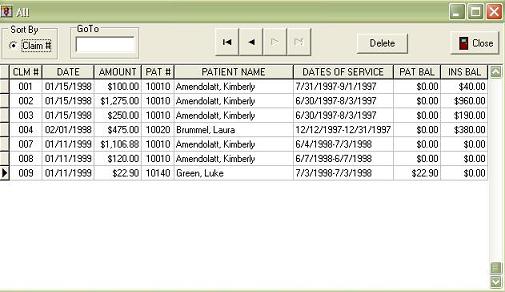
2. Click the Delete button. The following screen will appear.
3. Select the claim(s) you wish to remove and then click the Delete button. All charges linked to these claims will automatically revert back to an unbilled state, enabling you to re-bill them immediately or with the next batch of claims you send.
4. OR open a patient file and navigate to the Insurance Claims tab. Highlight the claim you wish to remove and then click Delete. Charges previously linked to this claim will now revert back to a "to bill" state.
5. Now you may re-bill the claim as you would normally bill any other claim using the steps outlined at the top of this page.
The QuickBilling Report
The QuickBilling report is designed to help you track the status of your insurance claims as they transmit from your system to our servers, and from there to the clearinghouse and finally the insurance carrier. Anytime you electronically transmit a batch of insurance claims, you will immediately see a QuickBilling reporting the status of the claims transmitted in that batch. This report only shows claims that were transmitted the single most recent batch. Status for claims transmitted prior to this batch will not be included.
! IMPORTANT: It is crucial that you check your QuickBilling report for outstanding claims at least once a day. Status on electronically submitted insurance claims changes as they move from one place to the next. If a insurance claim is received and validated by the QuickPractice server, it can still be rejected by our contracted clearinghouse, or at any point in between the time it leaves your system and arrives at the payer.
To view your QuickBilling report at any time, follow the procedure below.
1. From QuickPracitce, click on the Billing Menu.
2. At the bottom of the menu, select QuickBilling Report.
3. The menu will expand. Select the appropriate range of claims to be displayed on the QuickBilling report.
4. Selecting All Unpaid Claims will generate a QuickBilling report showing all claims that still have outstanding balances linked to them.
Claim Status can also be checked on individual claims.
1. Open a patient information screen and navigate to the Insurance Claims tab.
2. Highlight and right-click on the desired insurance claim.
3. From the menu select QuickBilling History.
4. A QuickBilling report will be displayed showing claim status for a single claim.