|
First you will need to add a new
patient.
1. Click the Add button on the left of
the patient information screen.
2. After you
have created a patient, you should fill in the rest of the
patient demographics, starting with the patient's last name. You
can navigate your cursor from field to field by pressing down on
the Tab key on your computer's keyboard.
|
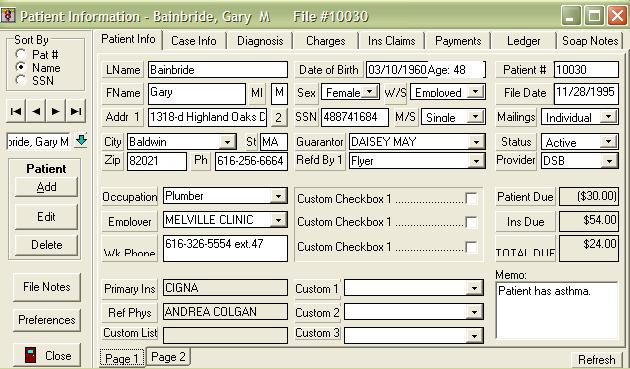
Refer to the table below as a guide for referencing each
field in the Patient Information screen.
Or, jump
to page 2 of the Patient
Info file.
|
- LName
- Enter the patient's last
name.
- FName
- Enter the patient's first
name.
- MI
- Enter the patient's middle
initial.
- Date of
Birth - Enter the patient's date of birth
(MM/DD/YYYY format).
- Sex
- Enter the patient's
sex.
- W/S
- Enter the
patient's employment status.
- SSN
- Enter the patient's social security
number.
- M/S
- Enter the patient's marital
status.
- City/St/Zip - Enter the patient's
mailing address or whatever address you wish the bills to be
sent to.
- Ph - Enter the patient's telephone
number.
- Patient
# - This is the patient's automatically
generated number. If you wish, you may change this number
to one that corresponds with your practice's own numbering
system. For example "A10" or "NY10010".
- File
Date - The file date is the date stamped onto
the chart on the day it was initially created. You can edit this
date to whatever you would like in the instance that you are
creating a patient record any number of days after they actually
had their first visit.
- Mailings - Set the patient's
mailing status to head of house hold, individual
etc.
- Status
- Set the patient's status to active or inactive
for marketing purposes. Patient's who have an "inactive" flag
will be excluded from all marketing lists generated with
QuickPractice.
- Provider - Select the patient's
primary provider to be linked to all posted charges, unless
otherwise specified.
- Guarantor -
A
guarantor is someone who pledges that a loan or other type of
debt will be paid. For example a child patient’s guarantor would
usually be one of his parents. You can access and edit the
guarantors available to your practice by clicking Lists>Guarantors.
- Refd By 1 -
This
is for tracking how the patient was referred by, whether it by
another patient, doctor, billboard, magazine ad etc. You can
access and edit the Referred by list by clicking Lists> Other->Referred
by.
- Occupation
- The patient’s
occupation, for reference purposes. You can access and edit the
occupations list by clicking Lists->
Other->Occupations.
- Employer - The
patient’s
employer, for marketing and reference purpose. You can access
and edit the employer list by clicking Lists> Other>Employers.
- WK
Phone - The patient's work telephone number.
- Primary
Ins - The patient's primary insurance company.
The primary insurance company is always specified in the
"insurance" section under the Case
Info tab.
- Ref
Phys - The Patient's referring physician. The
referring physician can be added or changed under the "claim
data" section of the Case
Info tab.
- Custom Field 1, 2,
3 - These
fields can be modified for any practice specific purpose.
An example would be maybe Blood-Type or Body-Type. You can
access and edit the custom field list by clicking Lists-> Other> Custom
Fields.
- Memo -
The
Memo field is where
you would generally put any patient specific notes.
- Patient
Due - This field displays the patient's portion
of the
balance.
- Ins
Due - This field displays the insurance
carrier's portion of the
balance.
- Total Due - This field displays
the entire combined balance that is
due.
- Refresh
- This
button will re-access the database and update the information
being displayed accordingly. This button is generally only
needed in multiple machine environments when more than one
machine is accessing & modifying the same patient record
simultaneously.
|
|
|