![]() Printing Insurance Claims Onto
CMS-1550 forms or Blank Paper
Printing Insurance Claims Onto
CMS-1550 forms or Blank Paper
To print an insurance claim to a pre-formatted CMS-1500 form, or to a piece of blank paper, follow the procedure below.
! IMPORTANT: Before you begin, you must have charges that are ready to be billed. A charge that is ready to be billed will be highlighted with a "to bill" note inside the charges screen. To learn more about posting charges correctly, click here.
1. Click the
"QuickLink" at the top of the screen
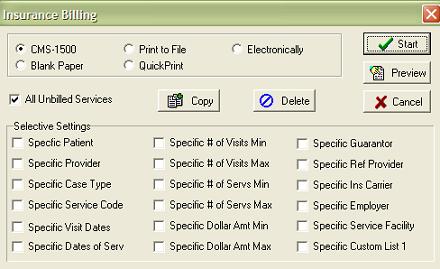
2. OR open a patient file and navigate to the Insurance Tab and then click the Add button. The following window will appear.
3. To print your claims, place the dot next to either the CMS-1500 or Blank Paper labels.
! IMPORTANT: If you wish to print claims locally in your office, do not select QuickPrint. Claims generated using this option are transmitted electronically to QuickPractice's QuickBilling servers, and then printed out at a remote location.
4. To print a claim for every unbilled service in your system, simply leave the check mark next to the Unbilled Services label. The software will group all charge labeled "to bill" together then print them onto multiple claim forms. This procedure is often referred to as printing a "batch".
5. If you do not want to print a large batch of all claims, you can chose from the Selective Settings on the bottom of the insurance billing component. Choosing from these selective settings will limit the claims generated to the criteria selected. For example, if you want to print claims for one specific patient, place a check mark next to the Specific Patient label and then select the patient from the list. Claims linked to other patient's will not be generated at this time.
Note: The number of available selective settings will vary depending on which version of the software you have purchased.
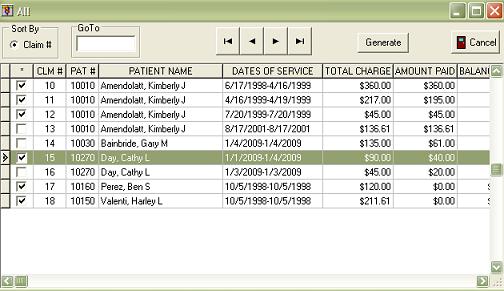
6. After you have used your selective settings, click the Start button to print the claims. You may also click the Preview button to view a list of claims that will be generated before they are printed out. The following screen will appear.
7. From the Preview list you may deselect claims that you do not wish to print. After you are satisfied with the selected claims, click the Generate button to print.
8. A Windows print dialogue will appear. Click the OK button to initiate the print job.