![]() Patient
Statements
Patient
Statements
Patient statements are used to notify a patient or their guarantor on the status of their entire account. Unlike the bill, patient statements display not only patient charges but also the payments, transfers and write-offs that have all affect the final balance.
To view an example of a patient statement, view the bottom of the page.
To generate a statement for one or more of your patient's, follow the procedure below.
1. Click the
QuickLink at the top of the screen
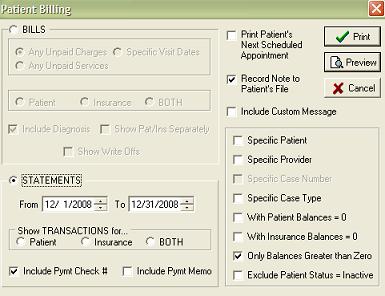
2. OR click on the Billing menu and select Patient Billing. The following screen will appear.
3. Select a date range for the transactions you wish to be included on the statement. Transactions falling outside of this parameter will not affect the balance shown on the statement.
4. Indicate which portion responsibility you want to print to the statement.
- Selecting Patient will result in the statement displaying transactions that are linked to the patient.
- Selecting Insurance will result in the statement displaying transactions that are linked to the insurance carrier.
- Selecting Both will result in the statement displaying transactions that are linked to both the patient and the insurance.
5. Place a check mark net to Include Payment Check # and Include Payment Memo if you want the statement to display either of these two items on the printed form.
6. There are a number of selective settings that can help you to tailor which statements are printed and which others are excluded.
- Place a check mark next to Specific Patient, Specific Provider, Specific Case Number or Specific Case Type to filter the printed document by any of these items.
- Place a check mark next to With Patient Balances = 0 to exclude patients that have a patient balance greater than zero.
- Place a check mark next to With Insurance Balances = 0 to exclude patients who have an insurance balance greater than zero.
- When billing for specific visit dates, place a check mark next to Only Balances Greater Than Zero to exclude those patient's who have a zero balance.
- Place a check mark next to Exclude Patient Status = Inactive to exclude patient's who have had their file set to inactive status under Patient Information.
7. Place a check mark next to either Include Custom Message or Print Patient's Next Scheduled Appointment to print either of these item onto the statement.
8. Place a check mark next to Record Note to Patient File to automatically create a time stamped file note inside the Patient Information file whenever the statement is created.
9. Click the Preview button to preview the bill before you print it, OR click the Print button to print the statement(s).
Below is an example of a Patient Statement. Notice that charges are shown, as well as other transactions that have affected the balance. By looking at the example you will also see that the entire balance on the patient statement has been aged, with the balance split up in terms of how long each piece of it has been owned.