![]() Copying and Re-billing Insurance
Claims
Copying and Re-billing Insurance
Claims
It is often necessary to re-bill insurance claims that have already been sent to the carrier.
There are three different methods by which you may re-bill a claim that has previously been generated. After you decide which one of these methods is best for you, refer to the procedures in this section.
- Deleting the original claim and re-billing it with a new claim number and claim submission date.
- Using the Copy feature inside the Insurance Billing screen to reprint the original claim onto a blank CMS-1500 form, preserving the original claim number and submission date.
- Using the Re-bill/Tracer feature found under the Billing menu
To re-bill a claim by deleting it and resending it, follow the procedure below.
! IMPORTANT: This is the procedure that must be followed in order to re-bill claims that have been transmitted electronically.
1. Click the
"QuickLink" at the top of the screen. The Insurance Billing screen will appear.
2. Click the Delete button. The following screen will appear.
3. Select the claim(s) you wish to remove and then click the Delete button. All charges linked to these claims will automatically revert back to an unbilled state, enabling you to re bill them immediately or with the next batch of claims you send.
4. OR open a patient file and navigate to the Insurance Claims tab. Highlight the claim you wish to remove and then click Delete. Charges previously linked to this claim will now revert back to a "to bill" state.
5. Now you may re-bill the claim as you would normally bill any other claim using the steps outlined at the top of this page.
To re-bill a claim using the copy feature, follow the procedure below. The copy feature will print the claim with the original claim number and submission/print date.
1. Click the
2. Click the Copy button. The following screen will appear.
3. Holding down your keyboard's CTRL button, highlight the claims you wish to re-bill. You can also use the Go To field to search for a single claim number.
4. After you have highlighted all of the claims you wish to re bill, click the Select button.
5. A Windows print dialogue will appear. Click the OK button to initialize the print job.
Finally, you can use the Re-bill feature to print out all unpaid claims filed between a specified date range. An unpaid claim is defined as a claim that still has either an outstanding patient or insurance balance linked to it.
1. From QuickPractice, click on the Billing menu at the top of the screen.
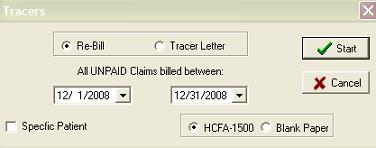
2. From the Billing menu, select Re-bills/Tracers. The following window will appear.
3. Place the dot next to the Re-Bill label. Placing a dot next to the Tracer level will cause the software to print a "tracer" letter for all unpaid claims within a specified date range. This letter can then be mailed to the insurance carrier to notify/inquire about the outstanding claims.
4. Specify a date range for claims needing to re-billed. Any unpaid claims falling outside of these date ranges will be excluded from the batch.
5. If you wish to limit the re-bill to a specific patient, place a check mark next to the Specific Patient label and then select the patient from the patient list. Unpaid claims belonging to other patients will not be printed.
6. Place a dot next to HCFA-1500 to print the claims onto a blank CMS-1500 form loaded into your printer. Place the dot next to Blank Paper to print the entire image of the insurance claim, not just the black text.
7. Click Start to initialize the print job.